
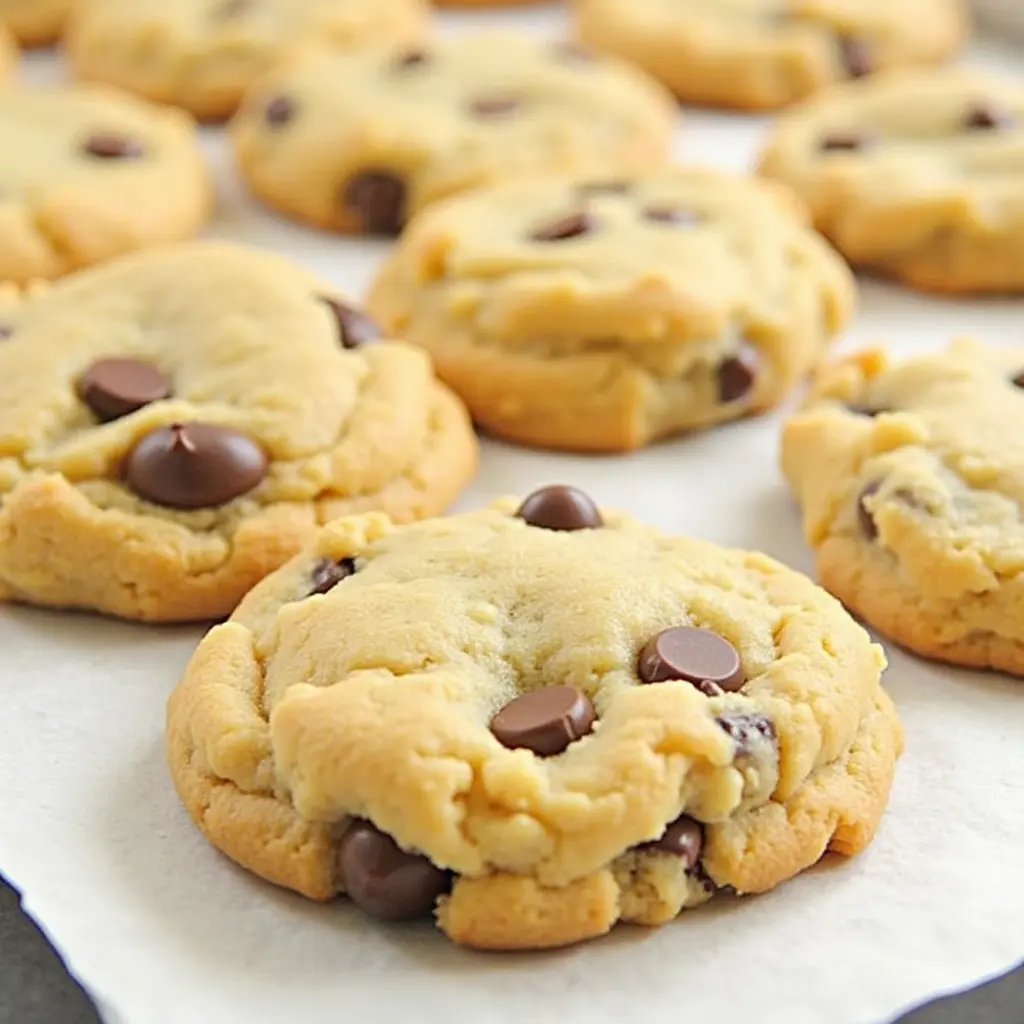
Who doesn’t love a classic chocolate chip cookie? These beloved treats are a universal favorite, offering the perfect balance of buttery goodness, melty chocolate, and soft, chewy texture. Whether you’re a seasoned baker or a total beginner, this recipe is your ticket to homemade cookie perfection—without the hassle!
With just a handful of simple ingredients and 20 minutes from start to finish, you’ll have warm, freshly baked cookies ready to enjoy. No fancy techniques, no chilling required—just quick, foolproof steps that deliver irresistibly delicious results every single time.
Craving cookies but short on time? Keep reading to discover how easy it is to whip up a batch of these mouthwatering chocolate chip cookies. You’re just a few steps away from the ultimate homemade treat! 🍪
Why This is the Best Chocolate Chip Cookie Recipe
Perfect for Busy Days
Life can get hectic, but that doesn’t mean you need to miss out on homemade comfort food. This chocolate chip cookie recipe is designed with busy schedules in mind, making it the ultimate go-to for anyone short on time. Here’s why it’s perfect for those on the move:
- Quick Prep Time: In just 10 minutes, you can have the dough ready to go. The recipe uses simple techniques like creaming butter and sugar that don’t require advanced skills or extra tools, saving you precious time in the kitchen.
- No Chilling Required: Unlike many cookie recipes that call for chilling the dough for hours, this one skips that step altogether. You can go straight from mixing to baking without sacrificing flavor or texture.
- Fast Bake Time: With a baking time of just 8–10 minutes, you’ll have cookies ready to enjoy in no time. Whether it’s a last-minute craving, an unexpected guest, or a snack for the kids, this recipe has you covered.
- Minimal Cleanup: Since this recipe only requires basic kitchen tools like a mixing bowl, spoon, and baking sheet, you won’t be left with a pile of dishes. Spend less time cleaning and more time enjoying your freshly baked cookies.
This recipe is proof that even on the busiest days, you can take a small break to treat yourself (and your loved ones) to something sweet and satisfying. Whether it’s a midday pick-me-up or a quick dessert after dinner, these cookies are a delicious reminder that good things don’t have to take a lot of time.
Soft and Chewy Texture
One of the things that sets these chocolate chip cookies apart from the rest is their perfect texture: soft, chewy, and melt-in-your-mouth delicious. Achieving the ideal balance of chewiness and softness isn’t as complicated as it might sound. This recipe focuses on key techniques and ingredient choices that guarantee that irresistible bite every time. Here’s how we make it happen:
- The Secret Ingredient—Brown Sugar: The addition of brown sugar gives these cookies their signature softness and chew. Brown sugar retains more moisture than white sugar, which helps the cookies stay soft in the center while the edges crisp up perfectly. This simple ingredient swap is the key to getting that melt-in-your-mouth texture.
- Avoid Overmixing the Dough: When mixing the dough, it’s important not to overmix once you add the flour. Overmixing can cause the cookies to turn out tough, as it activates the gluten too much. Mix just until the flour is incorporated, and you’ll keep the cookies soft and tender.
- Slightly Undercook for Softness: One of the secrets to soft cookies is taking them out of the oven just before they look completely done. Leave them in for 8–10 minutes, so the edges are golden, but the center is still a little soft. As the cookies cool, they’ll firm up just enough, while maintaining that signature chewy texture.
- Use Room-Temperature Butter: Softened butter is another crucial factor in achieving that melt-in-your-mouth texture. Cold butter doesn’t incorporate as smoothly into the dough, which can lead to cookies that are a bit firmer. Room-temperature butter blends more evenly, creating a smooth dough that bakes into a soft, chewy cookie.
- The Right Amount of Baking Soda: Baking soda is essential for creating lift and spreading in your cookies. Too much can make them spread too thin and become crisp, while too little can result in cookies that are overly dense. The right amount, as listed in the recipe, ensures that your cookies have the perfect chewy bite without being too flat or too cakey.
These small, thoughtful steps combine to create a cookie with a chewy texture that’s hard to resist. Every bite offers that perfect balance between soft, gooey chocolate chips and tender cookie dough. Whether you’re a soft-cookie lover or just looking to treat yourself to something delicious, this recipe promises cookies that are as satisfying to eat as they are to bake!
Beginner-Friendly Baking
If you’re new to baking or just looking for a stress-free recipe to get started, this easy chocolate chip cookie recipe is a perfect choice. It’s designed with simplicity in mind, so you can achieve delicious results without any complicated steps or specialized skills. Here’s why this recipe is ideal for beginners:
- Simple Ingredients: The recipe uses basic pantry staples that most people already have on hand—flour, sugar, butter, eggs, chocolate chips, and a few baking essentials. No need to hunt for specialty ingredients or unfamiliar items. If you’ve ever baked before, you’ll recognize these ingredients and feel confident in handling them.
- Minimal Equipment Needed: All you need are a few basic kitchen tools: a mixing bowl, measuring cups, a spoon (or mixer if you prefer), and a baking sheet. There’s no need for expensive gadgets or complicated machinery—just the essentials to mix and bake your dough. This makes the process approachable, even if you don’t have a lot of baking equipment.
- Easy-to-Follow Instructions: The recipe is broken down into straightforward steps with clear instructions. You won’t have to guess or get lost in technical terms. From creaming the butter and sugar to shaping the dough and baking, the process is simple and intuitive. This helps take away any potential anxiety about making cookies for the first time.
- No Special Techniques Required: You won’t need to master any complicated techniques like piping, frosting, or precise measuring. The recipe is focused on easy, foundational skills like mixing, spooning dough, and watching for the right baking time. Even if you’ve never baked before, you can still create delicious cookies without feeling overwhelmed.
- Quick and Rewarding Results: One of the best parts about baking as a beginner is seeing quick results that boost your confidence. This recipe is fast—about 20 minutes total—and the outcome is a batch of mouthwatering cookies that will make you feel like a pro. Plus, the instant satisfaction of a warm, fresh cookie will make you want to try your hand at even more baked goods.
- Mistake-Proofing: Even if you make a small mistake along the way, the recipe is forgiving enough to still give you great results. Whether you mix a little too long or add an extra chocolate chip, you can still enjoy soft, chewy cookies. Baking is as much about learning from experience as it is about following a recipe, and this one is designed to make the learning process enjoyable and stress-free.
This recipe offers a perfect opportunity for beginners to dip their toes into the world of baking without fear of failure. By keeping things simple, quick, and rewarding, it’s a great starting point for building confidence and discovering the joy of homemade baking. Before you know it, you’ll be whipping up cookies (and other baked treats) with ease!
Quick Prep and Bake Time
One of the standout features of this chocolate chip cookie recipe is how fast it is from start to finish—perfect for when you’re craving something sweet but don’t have a lot of time. With a quick prep and bake time, this recipe delivers fresh, warm cookies in just 20 minutes! Here’s how we keep it fast and efficient:
- Effortless Mixing:
The dough comes together in no time. There’s no need for complicated techniques or long mixing times. Start by creaming the butter and sugars together, which only takes a couple of minutes. Then, simply add the dry ingredients and stir in the chocolate chips. The whole mixing process is done in about 10 minutes, making it perfect for busy days when you want to avoid spending too much time in the kitchen. - No Chilling, No Waiting:
Unlike many cookie recipes that require you to chill the dough for hours, this one skips that step entirely. Chilling dough helps prevent cookies from spreading too much, but since this recipe uses a balance of ingredients that work perfectly without it, you can jump straight to baking. This means no waiting around, and you’re just minutes away from having warm cookies in your hands. - Fast Baking Time:
The cookies bake in just 8–10 minutes! Since the dough is already at room temperature and the oven is preheated, there’s no long bake time required. The heat from the oven quickly transforms the dough into golden-brown cookies with soft, chewy centers and crisp edges. You don’t have to worry about waiting forever for them to cook, and they come out perfectly each time. - Multi-tasking Made Easy:
While the cookies are baking, you can quickly clean up, prep a cup of coffee, or even set the table for a snack. The fast bake time gives you the flexibility to get other tasks done while the cookies do their thing in the oven. With the kitchen smelling like freshly baked cookies in just 10 minutes, it’s easy to multitask without feeling rushed. - Perfect for Last-Minute Treats:
Whether you’ve forgotten about a gathering, have a last-minute craving, or need a quick snack for the kids, this recipe is your go-to for a speedy solution. You won’t have to plan ahead or carve out an hour for baking. Just 20 minutes from start to finish, and you’ve got a delicious batch of homemade cookies that are ready to devour.
This quick prep and bake time make this chocolate chip cookie recipe an absolute lifesaver when you need something sweet fast. Whether you’re baking on a busy afternoon or preparing a treat for guests, you’ll appreciate how simple and speedy the process is without sacrificing taste or quality. You’ll be indulging in fresh cookies in no time—no long wait, no stress!
Ingredients You’ll Need for Quick Chocolate Chip Cookies
Staple Pantry Ingredients
One of the best things about this easy chocolate chip cookie recipe is that it requires very few ingredients—most of which you likely already have in your pantry. These staple ingredients not only make the recipe quick and affordable but also contribute to the delicious flavor and texture of the cookies. Let’s take a closer look at these essential items:
- Flour:
All-purpose flour is the base of the dough and provides structure to the cookies. It’s a pantry staple that works well in most baking recipes. The flour in this recipe helps give the cookies a tender texture without making them too thick or too thin. It’s a versatile ingredient that’s easy to find and usually the first thing you grab when baking. - Sugar (Granulated and Brown):
Sugar plays a key role in both flavor and texture. Granulated white sugar provides sweetness and helps the cookies spread as they bake, while brown sugar brings a bit of moisture and depth to the flavor, giving the cookies that soft, chewy texture. The combination of both gives the cookies a perfect balance of sweetness, moisture, and chewiness that’s essential for the perfect chocolate chip cookie. - Butter:
Unsalted butter is the fat that brings richness to the cookies. It helps create that melt-in-your-mouth texture and enhances the flavor. Using unsalted butter is key because it allows you to control the amount of salt in the dough (which is added separately), ensuring the flavor is balanced just right. Butter also helps achieve that golden color and crisp edges that everyone loves in a good cookie. - Egg:
The egg is essential for binding the dough together, giving the cookies structure and helping them rise slightly during baking. It also adds richness and moisture to the dough, contributing to that desirable chewy texture. Most home bakers always have eggs on hand, making it easy to whip up a batch of cookies whenever the craving hits. - Baking Soda:
Baking soda is a leavening agent that helps the cookies spread and rise as they bake. It reacts with the acidic brown sugar to produce carbon dioxide, which creates the soft, light texture in the cookies. A small amount of baking soda is all you need to ensure that the cookies don’t turn out dense or flat. - Salt:
A pinch of salt is added to the dough to balance out the sweetness and enhance the other flavors. While it might seem like a small ingredient, it’s crucial for making the cookies taste full and well-rounded. Salt brings out the richness of the chocolate chips and helps round out the sweetness of the sugars. - Chocolate Chips:
Of course, no chocolate chip cookie is complete without the chocolate! Semi-sweet chocolate chips are the classic choice, giving the cookies that perfect mix of sweetness and richness. Whether you prefer milk chocolate, dark chocolate, or even a mix of both, these little bites of chocolate add gooey pockets of deliciousness to each cookie. Chocolate chips are a pantry staple in most homes, making this recipe easy to make any time a chocolate craving strikes.
These basic ingredients are the foundation of the recipe, and you don’t need anything fancy or specialized to make cookies that taste just like the ones you’d find in a bakery. By using simple pantry staples, you can bake a batch of warm, soft cookies with ease, anytime you need a sweet treat. Plus, if you already have these ingredients in your pantry, you’re just minutes away from enjoying homemade chocolate chip cookies!
Key Flavor Boosters
While the basic ingredients in the recipe lay the foundation for a great chocolate chip cookie, it’s the key flavor boosters that really take these cookies from good to exceptional. These ingredients add depth, richness, and complexity to the cookies, making them even more irresistible. Let’s dive into the flavor-enhancing components that make these cookies so special:
- Vanilla Extract:
Vanilla is a classic flavor booster that brings warmth and richness to the dough. Even though it’s a small addition, vanilla extract is essential for elevating the overall taste of the cookies. It complements the sweetness of the sugar and chocolate chips, while adding a subtle depth of flavor that makes the cookies taste homemade. Be sure to use pure vanilla extract rather than imitation vanilla for the best flavor. - Brown Sugar:
Brown sugar does more than just add sweetness; it imparts a slight molasses flavor that deepens the cookie’s taste and adds complexity. The moisture in brown sugar helps create that signature chewy texture, while its rich, caramel-like flavor enhances the overall flavor profile. The combination of brown and granulated sugar gives the cookies the perfect balance of sweetness and a hint of richness. - Salt:
While salt might seem like a counterintuitive addition to a sweet recipe, it actually plays a crucial role in enhancing and balancing the flavors. A pinch of salt helps cut through the sweetness of the sugars and chocolate, making the overall taste more harmonious. It also accentuates the other flavors in the cookie, especially the buttery richness, without being overpowering. Don’t skip the salt—it’s essential for a well-rounded flavor! - Chocolate Chips (or Chunks):
The type and quality of chocolate you choose can significantly influence the flavor of your cookies. Semi-sweet chocolate chips are the classic choice, offering the perfect balance of sweetness and bitterness to complement the dough. For a richer flavor, you could use dark chocolate chips, which will bring a more intense cocoa flavor and less sweetness. Alternatively, milk chocolate chips provide a creamier, sweeter taste, while adding chunks of chocolate can give your cookies larger pockets of gooey, melty chocolate. You can even mix and match for a more complex chocolate experience! - Optional Add-ins (Nuts or Spices):
If you’re looking to further enhance the flavor, consider adding optional ingredients like chopped nuts (walnuts, pecans, or almonds) or a dash of cinnamon. Chopped nuts add a delightful crunch and a nutty richness that pairs wonderfully with the chocolate. A touch of cinnamon can bring warmth and a subtle spiciness, adding a layer of complexity to the flavor. These add-ins can give your cookies a unique twist while keeping the base flavor intact. - Butter (Unsalted vs. Salted):
The type of butter you use also impacts the flavor. Unsalted butter is the preferred choice in this recipe because it allows you to control the salt levels, ensuring that the balance between sweetness and saltiness is just right. However, if you’re in a pinch and only have salted butter on hand, it can still work—just be mindful of the amount of added salt you use to avoid over-seasoning the dough. The rich, creamy flavor of butter is essential in creating that melt-in-your-mouth experience that makes these cookies so satisfying.
Together, these key flavor boosters create a well-rounded, mouthwatering cookie that’s more than just a simple treat. They work in harmony to make each bite bursting with rich, balanced flavors—soft, chewy, sweet, and just the right amount of salty. By thoughtfully incorporating these ingredients, you ensure that your chocolate chip cookies are not only quick and easy but also incredibly flavorful. So go ahead, give your taste buds a treat they won’t forget!
Choosing the Best Chocolate Chips
When it comes to chocolate chip cookies, the chocolate is arguably the most important ingredient—after all, they are chocolate chip cookies! Choosing the right type of chocolate chips is key to achieving the perfect balance of sweetness, richness, and texture. Whether you prefer a more traditional taste or want to experiment with different varieties, here’s how to choose the best chocolate chips for your batch:
- Semi-Sweet Chocolate Chips (Classic Choice):
The most common and traditional choice for chocolate chip cookies, semi-sweet chocolate chips strike the ideal balance between sweet and bitter. They provide a rich chocolate flavor without being too overpowering or too sweet. Since the dough itself already has sugar and brown sugar, semi-sweet chips complement it perfectly, allowing the chocolate to shine through without overwhelming the other flavors. This is the classic choice that most cookie recipes—including this one—are built around. - Milk Chocolate Chips (For a Sweeter Taste):
If you have a sweet tooth or prefer a softer, creamier chocolate flavor, milk chocolate chips are the way to go. These chips have a higher sugar content and a creamier texture, which makes them melt more smoothly. While milk chocolate chips result in a sweeter cookie overall, they still offer the familiar gooey chocolate experience. For those who like their cookies on the sweeter side with a more velvety finish, milk chocolate chips are a delicious choice. - Dark Chocolate Chips (For a Richer, More Intense Flavor):
For chocolate lovers who prefer a richer, less sweet cookie, dark chocolate chips are a great option. These chips have a higher percentage of cocoa, which gives them a deeper, more intense chocolate flavor. They’re less sweet than milk or semi-sweet chips, making them a great way to balance out the sweetness of the dough. Dark chocolate chips also add a touch of sophistication and complexity to your cookies, and they pair well with other add-ins like nuts or a sprinkle of sea salt for extra contrast. - Bittersweet or Unsweetened Chocolate Chips (For True Chocolate Lovers):
For those who are serious about chocolate, bittersweet or even unsweetened chocolate chips can elevate your cookies to a whole new level. Bittersweet chips have a higher cocoa content than semi-sweet chocolate chips, and unsweetened chips have little to no sugar, offering a bold and intense chocolate experience. These chips are perfect if you want a very rich, dark chocolate flavor that stands out against the sweetness of the dough. You can also pair them with a small amount of sugar in the dough for a perfect balance of rich and sweet. - Chocolate Chunks or Coarsely Chopped Chocolate (For a More Gourmet Touch):
If you want to add a unique texture to your cookies, consider using chocolate chunks or coarsely chopped chocolate instead of chips. Chunks of chocolate melt beautifully as they bake, creating pockets of gooey chocolate throughout your cookies. You’ll get bursts of chocolate in every bite, which adds a more decadent, luxurious feel to the cookies. Plus, you can experiment with using different types of chocolate (dark, milk, or white) for a more complex and varied chocolate experience. Chopped chocolate can also add a homemade, rustic look to your cookies. - White Chocolate Chips (For a Sweet Twist):
For a fun twist, you can opt for white chocolate chips. White chocolate provides a sweet, creamy flavor that contrasts beautifully with the darker, richer dough. While not technically “chocolate” in the traditional sense, white chocolate chips still offer a sweet, smooth flavor that pairs well with the chewy texture of the cookies. They are a great choice if you want to add a different flavor profile to your cookies without overwhelming the taste of the dough. You can even mix them with semi-sweet chocolate chips for a fun, two-toned effect. - Flavored or Specialty Chips (For Experimentation):
Don’t be afraid to experiment with flavored chocolate chips, such as mint chocolate, peanut butter, or caramel chips. These variations can add a unique twist to your cookies and open up new possibilities for flavor combinations. For example, mint chocolate chips are perfect for a refreshing, festive cookie, while peanut butter chips add a rich, nutty flavor that pairs beautifully with the chocolate. Keep in mind that when using specialty chips, you may want to adjust the amount of sugar in your dough to balance the flavors.
Tips for Using Chocolate Chips:
- Quality Matters: Choose high-quality chocolate chips for the best flavor. While the type of chocolate you use is important, so is the brand. Higher-quality chocolate will melt better, taste richer, and result in more satisfying cookies. Look for brands that use real cocoa butter and quality ingredients.
- Mix and Match: Don’t be afraid to combine different types of chocolate chips or chunks to create a more complex flavor. For example, combining dark chocolate and milk chocolate chips can offer both richness and sweetness in each bite.
- Be Generous with Chocolate: While this recipe calls for a specific amount of chocolate chips, feel free to add a little extra for those who love a cookie packed with chocolate. The more chocolate, the more gooey and indulgent your cookies will be!
The right chocolate chips are the key to unlocking the full potential of your chocolate chip cookies. Whether you stick with the classic semi-sweet chips or mix in a variety of chocolates for a fun twist, choosing the best chocolate will ensure that every bite is just as delicious as the last. So go ahead—pick your favorite (or try a few), and let the chocolate shine in your next batch of cookies!
Optional Add-Ins
While the basic chocolate chip cookie recipe is already delicious on its own, there are plenty of optional add-ins you can incorporate to personalize your cookies and make them even more unique. These additions bring new textures, flavors, and creative twists that can make each batch of cookies feel like a special treat. Here are some great optional add-ins to consider:
- Nuts (Walnuts, Pecans, Almonds, etc.):
Nuts are a classic and popular addition to chocolate chip cookies, adding a delightful crunch and nutty flavor that pairs perfectly with the chocolate. Walnuts are the most traditional choice, but you can also try pecans, almonds, or hazelnuts for a different flavor profile. Nuts not only enhance the texture of your cookies but also provide a nice contrast to the soft, chewy dough. If you’re using nuts, be sure to chop them into smaller pieces to ensure they’re evenly distributed throughout the dough. - Shredded Coconut:
Shredded coconut adds a chewy, slightly tropical flavor that complements the sweetness of the chocolate. Whether you use sweetened or unsweetened coconut flakes, this add-in will provide a subtle flavor and texture contrast, making the cookies even more indulgent. Coconut pairs wonderfully with chocolate chips, creating a combination that’s both familiar and exciting. - Oats (For an Oatmeal Chocolate Chip Twist):
For a heartier, more substantial cookie, consider adding old-fashioned rolled oats. Oats give the cookies a rustic, chewy texture and provide a slightly nutty flavor that blends beautifully with the chocolate chips. This is especially great for those who love oatmeal chocolate chip cookies, as oats bring a satisfying chewiness that complements the softness of the cookie. Just be sure to stick with rolled oats, as quick oats can make the texture too mushy. - Toffee Bits or Caramel Chunks:
If you love the rich, buttery flavor of caramel, toffee bits or caramel chunks are a fantastic addition. These little pieces of sweet, chewy caramel add an extra layer of sweetness and depth to your cookies. As they bake, they melt slightly and create pockets of gooey caramel throughout, which is a delightful surprise in every bite. Toffee bits also have a slight crunch and a buttery flavor that pairs beautifully with the chocolate. - Peanut Butter Chips:
Peanut butter chips add a deliciously creamy and nutty flavor to your chocolate chip cookies. The richness of peanut butter complements the chocolate chips beautifully, creating a sweet and salty balance. You can use them alone or mix them with chocolate chips for a fun, flavorful combo. For an even more decadent twist, try adding a dollop of peanut butter to the dough itself! - M&Ms or Other Candy Pieces:
For a fun, colorful twist, try adding M&Ms or small candy pieces to your cookies. The bright colors not only make the cookies more visually appealing but also add a burst of sweetness and texture. M&Ms, in particular, add a satisfying crunch and a sweet, candy-coated bite. You can use regular M&Ms or customize the flavors with peanut, pretzel, or peanut butter M&Ms for a fun variation. - Chopped Chocolate Bars:
While chocolate chips are the traditional choice, chopping up a chocolate bar into chunks creates a more rustic, gourmet-style cookie with large pockets of melted chocolate. You can use any type of chocolate bar—dark, milk, or white chocolate—or even mix and match different varieties for a more complex flavor. Chopped chocolate bars provide bigger, gooier pockets of chocolate that create a more indulgent cookie experience. - Spices (Cinnamon, Nutmeg, etc.):
Adding a pinch of ground cinnamon or nutmeg to your cookie dough can infuse the cookies with warm, cozy flavors that are perfect for the colder months. Cinnamon adds a touch of sweetness and spice that pairs wonderfully with the chocolate, while nutmeg offers a slightly nutty, aromatic flavor. For an even more seasonal twist, try a blend of cinnamon, nutmeg, and a little clove for a fall-inspired treat. - Mini Marshmallows (For a S’mores-Inspired Cookie):
If you love the idea of s’mores in cookie form, try adding mini marshmallows to the dough. As they bake, the marshmallows become soft and gooey, adding a sweet, melt-in-your-mouth texture to your cookies. You can even combine them with chocolate chips and crushed graham crackers to create the ultimate s’mores-inspired chocolate chip cookie. - Bacon Bits (For a Sweet and Savory Cookie):
For the more adventurous baker, adding crispy bacon bits to your chocolate chip cookies can create an unexpected and delightful sweet-and-savory flavor profile. The salty, smoky bacon pairs surprisingly well with the sweetness of the chocolate chips, making for a truly unique treat. This is an option for those who enjoy playing with contrasting flavors and textures in their baked goods. - Dried Fruit (Cranberries, Raisins, Cherries, etc.):
If you want to add a fruity twist to your cookies, consider mixing in dried fruit such as cranberries, raisins, or dried cherries. These fruits provide a chewy texture and a burst of tartness that complements the sweetness of the dough and chocolate. Dried cranberries or cherries work especially well with dark chocolate for a more complex, layered flavor profile.
Tips for Adding Optional Ingredients:
- Balance Flavors: When adding optional ingredients, be mindful of the overall flavor balance. For example, if you add sweet mix-ins like M&Ms or toffee, you may want to reduce the sugar slightly to avoid making the cookies too sweet.
- Don’t Overload the Dough: While it’s tempting to load your cookies with as many add-ins as possible, keep in mind that too many mix-ins can make the dough difficult to handle or result in cookies that spread too much during baking. A good rule of thumb is to add no more than 1 to 1 ½ cups of add-ins for every batch of dough.
- Texture Considerations: Some add-ins, like oats or nuts, can affect the texture of your cookies, so be sure to mix them in evenly to ensure that every bite is well-balanced and enjoyable.
These optional add-ins allow you to get creative and customize your chocolate chip cookies to suit your personal taste. Whether you’re in the mood for a nutty crunch, a gooey caramel center, or a fun candy surprise, these additions make it easy to elevate your cookies and make them your own. Try experimenting with one or more of these ideas to create a batch of cookies that’s completely unique and bursting with flavor!
Step-by-Step Instructions for Perfect Cookies
Prep Work Made Easy
One of the best things about this easy chocolate chip cookie recipe is how straightforward and simple the prep work is. You don’t need any special equipment or advanced baking techniques to get started—just a few basic kitchen tools and a little bit of time. The simplicity of the preparation makes this recipe perfect for both beginner bakers and those who want to make a quick, hassle-free treat. Let’s break down how the prep work is made easy in this recipe:
- Minimal Ingredients, Maximum Flavor:
The recipe calls for just a handful of staple pantry ingredients, many of which you probably already have on hand. This means you don’t have to worry about hunting down hard-to-find ingredients or spending hours at the store. With simple items like flour, sugar, butter, eggs, and chocolate chips, you can have the dough ready to go in no time. The fewer ingredients you need to measure out, the quicker the prep process becomes, allowing you to spend more time enjoying the cookies rather than stressing over complicated steps. - One-Bowl Mixing Method:
For even easier prep, this recipe utilizes a one-bowl mixing method, which means you can combine all of your ingredients in a single bowl. This not only simplifies the process but also cuts down on the mess—no need to dirty multiple bowls or utensils. Start by creaming together the butter and sugars, then gradually mix in the eggs and dry ingredients. Finally, fold in the chocolate chips (and any optional add-ins). This streamlined method makes for quick cleanup too, since you don’t have a bunch of bowls to wash after baking. - No Chilling Required:
Many cookie recipes call for chilling the dough for an hour or more before baking to help the cookies hold their shape and prevent them from spreading too much. However, this easy chocolate chip cookie recipe skips that step entirely. There’s no need to wait around—once your dough is mixed, you can scoop it directly onto your baking sheet and pop it into the oven. This cuts down on prep time and allows you to bake fresh, warm cookies almost immediately. - Simple Tools, No Special Equipment Needed:
You don’t need any specialized kitchen tools to make these cookies. A basic mixing bowl, measuring cups and spoons, and a cookie scoop or spoon are all you need. You can mix the dough with a simple hand mixer or a wooden spoon, depending on your preference. You can even skip the mixer entirely if you want to get a good arm workout! With just a few basic tools, you’ll have everything you need to create delicious cookies without feeling overwhelmed by complex prep steps. - Flexible Mixing Time:
Whether you mix the dough by hand or use a mixer, the process is forgiving. The ingredients don’t require precise timing or overmixing—simply mix until everything is just combined. This flexibility means you don’t need to stress about perfect technique or overthinking the process. The dough will come together easily, even if you’re not a seasoned baker. - Pre-Portioned Dough for Easy Baking:
After mixing the dough, you can use a cookie scoop or a spoon to form evenly sized balls of dough. This makes portioning the dough quick and efficient, ensuring uniform cookies that bake at the same rate. If you prefer slightly larger or smaller cookies, you can easily adjust the portion size to suit your taste. You can even roll the dough into a log and slice it into rounds for a more uniform shape if you prefer. - Minimal Baking Time:
The baking time for these cookies is also incredibly short, making the prep-to-bake process fast and efficient. In just 8-10 minutes, you’ll have perfectly baked cookies with golden edges and gooey chocolate centers. Unlike some cookies that require a long time in the oven, these cookies bake quickly, so you don’t have to spend much time waiting. You’ll be able to enjoy freshly baked cookies in no time! - Clean and Simple Cleanup:
Because you’re using a one-bowl method and only a few basic utensils, cleanup is quick and easy. After baking, all you’ll need to wash are the mixing bowl, measuring spoons, and cookie scoop (or spoon). No elaborate equipment means fewer items to wash, and fewer things to worry about after you’ve enjoyed your warm, freshly baked cookies.
Time-Saving Tip:
If you’re looking to save even more time, you can pre-portion the dough into individual balls and freeze them. Once frozen, you can store the dough balls in a Ziploc bag or airtight container and bake them fresh when you’re craving cookies. Just pop the frozen dough balls directly onto a baking sheet and bake for a minute or two longer than the recipe suggests. This is a great way to have cookie dough ready to go at a moment’s notice—perfect for busy days or impromptu dessert cravings!
The prep work for these chocolate chip cookies is so straightforward and hassle-free that anyone can do it, regardless of their experience in the kitchen. With minimal ingredients, a simple method, and no chilling required, you’ll have your cookies ready in no time, leaving you with more time to enjoy the delicious results. Whether you’re making a batch for yourself or sharing with others, the easy prep work ensures that you can bake cookies quickly, efficiently, and with ease.
Mixing Ingredients Like a Pro
Mixing the ingredients for your chocolate chip cookies might seem like a simple task, but the way you combine the ingredients can significantly impact the texture and consistency of the final cookies. In this section, we’ll break down the best practices for mixing your cookie dough like a pro, ensuring that you get the perfect balance of soft and chewy cookies with just the right amount of spread.
- Creaming Butter and Sugars Together:
The first step in making the dough is to cream the butter and sugars (both granulated and brown). This step is crucial because it creates the foundation for the texture and structure of your cookies. The butter should be at room temperature, soft but not melted, to allow for optimal creaming. Using an electric mixer or a handheld whisk, beat the butter and sugars together until the mixture is light, fluffy, and pale in color. This incorporates air into the dough, which helps the cookies rise slightly and become light and chewy rather than dense. If you overmix at this stage, though, your cookies could turn out too soft and spread too much. Aim for a soft, airy texture that has a slightly grainy feel due to the sugar crystals. - Don’t Overmix Once Eggs Are Added:
After creaming the butter and sugars, it’s time to add the eggs. This is where you want to be a bit more gentle. When you add the eggs (one at a time), mix on low speed just until the egg is fully incorporated. Overmixing at this stage can cause the dough to become tough, so it’s important to stop as soon as you no longer see streaks of egg. Mixing too much will activate the gluten in the flour, resulting in cookies that are more cake-like and less chewy. A quick mix is all it takes to bring everything together, ensuring that the dough stays tender and doesn’t develop excess gluten. - Incorporating Dry Ingredients with Care:
The next step is to combine the dry ingredients—typically flour, baking soda (or baking powder), and salt. To ensure that your cookies have an even structure and rise properly, whisk the dry ingredients together in a separate bowl before adding them to the wet ingredients. This helps evenly distribute the baking soda and salt, preventing any pockets of baking soda that could result in uneven baking or an odd taste. Once mixed, add the dry ingredients to the wet mixture in two or three batches. You can use a wooden spoon or a rubber spatula to fold the dry ingredients into the wet ingredients gently. Avoid using a mixer at this stage because overmixing the dough could cause your cookies to turn out tough. Mix just until the flour is incorporated—don’t worry if the dough still looks a bit crumbly. It should come together when you add the chocolate chips. - Folding in the Chocolate Chips and Optional Add-Ins:
When it comes time to add the chocolate chips (and any other add-ins like nuts, coconut, or dried fruit), fold them in gently by hand using a rubber spatula. This ensures that the chocolate chips are evenly distributed throughout the dough without overworking it. Overmixing the dough with chocolate chips can cause them to break down or melt slightly, resulting in less defined chocolate pockets. By folding them in, you keep the chips intact, and each bite will have a delicious burst of chocolate. If you’re adding optional ingredients like nuts, toffee bits, or candy pieces, be sure to fold those in as well. The key here is to incorporate the add-ins without causing the dough to lose its texture. - Checking Dough Consistency:
After mixing everything together, give the dough a quick check to ensure it’s the right consistency. The dough should be thick, slightly sticky, and hold its shape when scooped. If the dough is too dry and crumbly, add a tablespoon of milk or water at a time to bring it together. If the dough is too sticky and loose, add a little more flour, one tablespoon at a time, until it firms up slightly. You want the dough to be soft enough to scoop easily but firm enough to hold its shape when baking. - Resting the Dough (Optional, But Recommended):
While this recipe doesn’t require chilling, you can still allow the dough to rest for 10-15 minutes before baking. This rest period allows the flour to fully hydrate, helping the dough firm up and making it easier to handle. It also helps with flavor development, as the ingredients have a chance to meld together. Resting the dough briefly will give you a better consistency and may improve the final texture of your cookies, leading to a chewier bite and better spread during baking. - Don’t Overmix at Any Stage:
The key takeaway when mixing ingredients is to avoid overmixing. Overworking the dough at any stage can result in cookies that are too tough, dense, or dry. Aim for a gentle mix, especially when adding flour and the chocolate chips. The less you handle the dough, the better the final result will be, as you’ll preserve the soft and chewy texture that makes these cookies irresistible.
Pro Tip for Even Mixing:
If you’re adding a lot of optional ingredients (like nuts or dried fruit), it’s a good idea to toss them in a little bit of flour before adding them to the dough. This will help prevent them from sinking to the bottom during baking, ensuring they stay evenly distributed throughout the cookie.
Mixing the ingredients for your chocolate chip cookies might seem simple, but doing it correctly ensures that your cookies have the perfect texture and consistency. By following these pro tips for each step, you’ll end up with cookies that are perfectly chewy on the inside, slightly crisp on the outside, and loaded with delicious chocolatey goodness. Happy baking!
Shaping and Spacing the Dough
Shaping and spacing the cookie dough properly is an important step in ensuring that your chocolate chip cookies bake evenly and achieve the perfect texture. This step directly affects how your cookies spread, how thick or thin they become, and how uniform they look. With just a few simple techniques, you can elevate your cookie-making game and ensure that each cookie turns out just the way you want it. Here’s how to master the shaping and spacing of your cookie dough:
- Forming Even Dough Balls:
One of the easiest ways to ensure your cookies bake uniformly is by forming even-sized dough balls. This helps them cook at the same rate and ensures that each cookie has the same texture. You can use a cookie scoop to easily portion out the dough into uniform balls. If you don’t have a scoop, you can use a tablespoon or your hands to roll the dough into balls. Aim for about 1 to 1.5 tablespoons of dough per cookie, which is the typical size for standard chocolate chip cookies. If you want larger, bakery-style cookies, you can make bigger dough balls, but keep in mind that this will affect the bake time—larger cookies may need a couple of extra minutes in the oven.Tip: If you’re making smaller cookies or mini versions, simply adjust the size of the dough balls and decrease the baking time slightly. - Roll the Dough for Uniformity:
After portioning the dough into balls, you can roll them between your palms to smooth them out. While this step is optional, rolling the dough ensures that your cookies will bake with a uniform surface, giving them a polished look. If you want a slightly rustic look, you can skip this and leave them as they are. However, rolling them helps prevent uneven edges that can result from craggy dough balls. You can also lightly press the dough balls down with your fingers or the back of a spoon to create a slightly flatter cookie shape if you prefer a thinner cookie.Pro Tip: If you’re aiming for a crispier, thinner cookie, gently press down on the dough ball before baking. If you prefer a thicker, chewier cookie, leave the dough ball in its round shape without flattening it. - Spacing the Dough on the Baking Sheet:
One of the most common mistakes when baking cookies is not giving the dough enough space on the baking sheet. Spacing the dough properly is essential to allow the cookies to spread evenly as they bake. If the dough balls are placed too close together, the cookies will merge into one giant cookie, resulting in uneven shapes and inconsistent baking.To avoid this, ensure that you space the dough balls at least 2 inches apart. This gives the cookies plenty of room to spread as they bake. If you’re baking multiple trays, be sure to rotate the trays halfway through baking to ensure even heat distribution, especially if your oven tends to have hot spots. - Chilling the Dough for Less Spread (Optional):
If you prefer cookies that don’t spread too much during baking, chilling the dough for about 10-15 minutes before baking can help. The cold dough will hold its shape better in the oven, resulting in thicker, more defined cookies. Chilling is especially helpful if you’ve added a lot of butter or have a warm kitchen, as it can prevent the cookies from spreading too thin while baking. Even if you’re not chilling for long, this brief resting period can give your cookies a more consistent texture and prevent them from flattening too much.Tip: If you’re preparing dough in advance, you can chill the dough in the refrigerator for up to 24 hours. In this case, just scoop the dough out directly onto the baking sheet and bake as usual—no need to thaw the dough first. - Using a Baking Mat or Parchment Paper:
To make sure your cookies bake evenly and don’t stick to the baking sheet, use a baking mat or parchment paper. These tools help with even heat distribution and prevent the dough from sticking to the tray, ensuring that your cookies come off easily when they’re done. If you don’t have either of these, you can lightly grease the baking sheet or use nonstick cooking spray, but parchment paper or a mat is always the best option for perfect cookies. - For a Special Touch, Roll in Sugar Before Baking:
For cookies with a slightly crispier exterior and an extra touch of sweetness, try rolling the dough balls in sugar before placing them on the baking sheet. You can use granulated sugar for a basic sparkle, or experiment with turbinado sugar or cinnamon sugar for a more flavorful twist. This extra step creates a lovely sugary crust around the cookies, adding a pleasant crunch and a beautiful golden finish to your chocolate chip cookies. - Evenly Spaced on Multiple Trays:
If you’re making a larger batch and need to bake more than one tray of cookies at a time, make sure the trays are properly spaced in the oven. The air circulation is crucial for even baking, so avoid crowding the trays. If your oven has multiple racks, position the trays in the center and ensure they’re at least 2 inches apart from each other to allow air to circulate freely. Rotate the trays halfway through the baking time for even cooking. - Handling Overly Sticky Dough:
If you find that the dough is too sticky to shape, especially in a warm kitchen, you can lightly dust your hands with a small amount of flour or powdered sugar before rolling the dough balls. Alternatively, chill the dough for a few minutes in the refrigerator to make it easier to handle. This can help you form smoother dough balls and prevent the dough from sticking to your hands, especially if you’re not using a cookie scoop.
Bonus Tip: Freeze Cookie Dough for Later Use
If you want to prep your dough in advance, you can also freeze the shaped dough balls. Simply place them on a baking sheet in a single layer and freeze until solid, then transfer the frozen dough balls to an airtight container or freezer bag. When you’re ready to bake, simply place the frozen dough on a baking sheet and add an extra minute or two to the bake time. Freezing the dough also allows you to enjoy freshly baked cookies at a moment’s notice!
By following these simple steps for shaping and spacing your cookie dough, you’ll set yourself up for success in the oven. Proper shaping ensures that your cookies bake evenly, have a consistent texture, and look beautifully uniform when they come out of the oven. Whether you like thick, chewy cookies or thin, crispy ones, getting the shaping and spacing right is key to achieving your perfect cookie.
Baking to Perfection
Baking your chocolate chip cookies to perfection is the final and most critical step in the process. Even with the best dough, the right baking technique ensures your cookies achieve the ideal texture—soft and chewy on the inside with a slight crispness on the edges. Here’s how to bake your cookies to perfection, step by step, ensuring you end up with golden, gooey, melt-in-your-mouth cookies every time.
- Preheat the Oven to the Right Temperature:
One of the most important steps in baking cookies is ensuring your oven is preheated to the correct temperature. Preheat your oven to 350°F (175°C) before placing your cookies in. This ensures that the cookies bake evenly and consistently from the moment they go in. An oven that isn’t fully heated can result in uneven spreading, underbaked centers, or overcooked edges. You can use an oven thermometer if you’re unsure about your oven’s true temperature, as many ovens can run a little hotter or cooler than the displayed temperature. - Check for Even Heat Distribution:
When baking multiple trays of cookies, ensure that the heat circulates evenly throughout the oven. Position your baking sheets in the center of the oven to allow hot air to circulate evenly around the cookies. Avoid crowding the oven with too many trays at once. If you’re using two trays, make sure to rotate them halfway through baking to ensure that both sets bake evenly. Most ovens have hot spots, so rotating the trays helps achieve an even golden brown color on all your cookies.Pro Tip: If you’re using multiple trays, stagger their position—one in the upper middle rack and the other in the lower middle rack—to allow the heat to reach all cookies without creating uneven baking. - Baking Time and Monitoring:
The recommended baking time for chocolate chip cookies is usually around 8-10 minutes at 350°F (175°C), but baking times can vary depending on the size of your cookies and the oven. It’s important to keep an eye on them as they bake. Start checking your cookies at 8 minutes, and look for these visual cues to indicate that they’re ready:- The edges should be light golden brown.
- The tops should look set, with a slightly soft center that will firm up as the cookies cool.
- The cookies should have slightly puffed up edges but not too much rise, which could indicate overmixing of the dough.
- Don’t Overbake—Trust the Carryover Heat:
Overbaking cookies is one of the most common mistakes. If you leave your cookies in the oven too long, they can become hard and crunchy, losing that perfect chewy texture. Remember, cookies continue to bake even after you remove them from the oven because of the residual heat on the baking sheet. For perfectly chewy cookies, take them out when the edges are golden and the center is still a bit soft. They will firm up as they cool down.Pro Tip: If you’re unsure, it’s better to take them out slightly earlier than too late. You can always return them to the oven for an additional minute, but if they’re overdone, there’s no going back! - Let Them Cool on the Baking Sheet:
After removing the cookies from the oven, allow them to cool on the baking sheet for 2-3 minutes. During this time, the cookies will continue to firm up as they cool down. If you try to transfer them to a wire rack immediately, they may break apart since they’ll still be quite soft. Cooling on the baking sheet gives them the chance to set, and the slight carryover heat from the pan helps them maintain their chewy texture. - Use a Wire Rack for Even Cooling:
Once the cookies have cooled for a few minutes on the baking sheet, transfer them to a wire cooling rack. This step is important for ensuring that the cookies cool evenly and don’t become soggy from the heat that collects underneath them. The wire rack allows air to circulate around the cookies, preventing moisture from accumulating at the bottom and helping them retain their crisp edges. - Watch for Variations in Size:
Keep in mind that the size of your dough balls will affect how long your cookies take to bake. Larger dough balls will require an extra minute or two in the oven, while smaller ones may bake more quickly. If you are making cookies in different sizes, it’s a good idea to bake them in separate batches to ensure even cooking. - Baking Multiple Batches:
If you’re baking multiple batches of cookies, cool the baking sheets completely before adding the next batch of dough. This helps prevent the dough from spreading too much when it hits a hot sheet and ensures each batch bakes evenly. If you’re short on time, you can speed up the cooling process by placing the baking sheets in the refrigerator for a few minutes. - Tips for Crispy or Chewy Cookies:
If you prefer your cookies to have a crispy edge and chewy center, bake them for the minimum amount of time, and remove them while the center is still soft. For chewier cookies, use a little more brown sugar and slightly underbake them, so they stay soft and gooey inside. For crispy cookies, let them bake a little longer until the edges are deeply golden, and the center is firm.
Pro Tip: Baking Stone for Even Heat:
If you bake cookies frequently, you might want to invest in a baking stone. It helps distribute heat evenly across the baking sheet, reducing the likelihood of hot spots and ensuring that your cookies bake evenly. Using a stone can improve your cookies’ texture by ensuring that the heat reaches every part of the dough evenly.
Baking Tip for Extra Gooey Cookies:
For extra gooey cookies, remove them from the oven just when the edges start to turn golden, but the centers are still soft. Let them cool on the baking sheet for 2-3 minutes before transferring to a cooling rack. You’ll notice the centers firm up as they cool, but they will remain soft and deliciously gooey.
By following these tips and techniques for baking your chocolate chip cookies, you’ll be able to create the perfect batch every time. From knowing when to remove them from the oven to understanding how to use carryover heat, baking your cookies to perfection is all about timing and observation. With a little practice, you’ll soon become a cookie-baking pro, turning out perfectly golden, chewy cookies that everyone will love!
Tips and Tricks for the Best Chocolate Chip Cookies
Keep Cookies Soft and Chewy
Achieving the perfect balance of soft and chewy chocolate chip cookies is the ultimate goal for many bakers. The key to consistently getting that delicious texture lies in a few simple yet effective techniques, both during the baking process and in how you store your cookies afterward. Here’s how to ensure your chocolate chip cookies stay soft and chewy, from start to finish.
- Use the Right Balance of Sugars:
One of the key ingredients for achieving a soft and chewy texture is the right balance of sugars. Brown sugar is a vital ingredient in chewy cookies because it contains molasses, which helps keep the cookies moist and tender. Brown sugar contributes to a chewier bite and a richer flavor. Granulated sugar, on the other hand, promotes spread and slight crispiness around the edges. A common ratio is using half brown sugar and half granulated sugar—this gives you the perfect combination of softness and a slight crisp edge. If you want even chewier cookies, you can increase the amount of brown sugar.Tip: Use light brown sugar for a more delicate flavor or dark brown sugar for a richer, molasses-like taste. - Don’t Overmix the Dough:
Overmixing the cookie dough can lead to tough, dense cookies. This happens because overmixing activates the gluten in the flour, which can make the cookies firm and chewy in the wrong way. When mixing the dough, do so just until the dry ingredients are incorporated—this ensures that you keep the cookies soft and tender.Pro Tip: When adding the flour to the dough, mix on a low speed if you’re using a stand mixer or use a spatula to gently fold in the flour by hand. This will avoid overworking the dough and keep it from becoming too tough. - Chill the Dough for Better Texture:
While chilling the dough is optional, it can greatly affect the texture and consistency of your cookies. Chilling the dough allows the flour to fully hydrate and can prevent the cookies from spreading too much in the oven. Additionally, the chilled dough retains its shape better, leading to thicker, softer cookies. If you prefer chewier cookies, give the dough at least 30 minutes to chill in the fridge. For even better results, you can chill the dough for up to 24 hours, which will also enhance the flavors as the ingredients have more time to meld together.Tip: If you don’t have time to chill the dough, try placing the dough in the fridge for 15 minutes before baking to get a slightly thicker, chewier result. - Use More Fat (Butter or Oil):
Fat is a key ingredient for soft and chewy cookies, as it helps retain moisture. Butter is a popular fat choice, but you can also incorporate vegetable oil or melted butter into your recipe. Using a higher proportion of fat in your dough helps keep the cookies soft by adding moisture, which prevents them from becoming dry and crumbly.Pro Tip: If you want even chewier cookies, consider using a combination of butter and oil—butter for flavor and oil for moisture retention. This can help ensure that the cookies stay soft even a few days after baking. - Underbake Slightly for a Soft Center:
To ensure your cookies remain chewy, undercook them slightly. Remove the cookies from the oven when they are still slightly underdone in the center, but the edges are golden. The residual heat from the baking sheet will continue cooking the cookies, allowing the centers to firm up without becoming hard. This method helps maintain a soft, gooey interior and ensures that the cookies stay moist and chewy once cooled.Tip: Keep an eye on the cookies during the last minute of baking. When the edges are golden and the centers look soft and slightly puffed, they’re ready to come out. - Avoid Overbaking:
Overbaking cookies, even by just a minute or two, can dry them out and result in cookies that are hard rather than chewy. To avoid overbaking, always start checking your cookies around the 8-minute mark if you’re baking at 350°F (175°C). When the edges are lightly golden, and the centers are still soft, it’s time to take them out. The cookies will continue to firm up on the baking sheet, but they will remain chewy and soft if you avoid baking them too long. - Add Moisture-Retaining Ingredients:
Incorporating ingredients that help retain moisture is an effective way to maintain soft, chewy cookies. Consider adding ingredients like cornstarch, which helps create a softer texture, or honey or molasses to provide additional moisture. These ingredients can help the dough stay soft, preventing it from becoming dry after baking.Pro Tip: If you’re looking for ultra-soft cookies, consider adding a small amount of cornstarch (about 1 tablespoon for every 1-1/2 cups of flour) to the dough. This can help create a more tender, soft texture. - Store Cookies Correctly:
Proper storage is just as important as the baking process when it comes to keeping cookies soft and chewy. Once the cookies have cooled completely, store them in an airtight container at room temperature. This prevents air from drying out the cookies, keeping them soft and chewy for several days. You can also place a slice of bread in the container with the cookies to help maintain moisture—cookies will absorb moisture from the bread, keeping them soft. Just be sure to change the bread slice every couple of days to prevent it from getting moldy.Tip: For added freshness, you can freeze the cookies. Freezing helps preserve their softness, and you can thaw them for a few minutes at room temperature or pop them in the microwave for a few seconds for that fresh-baked taste. - Don’t Skip the Salt:
While it might seem counterintuitive, a small pinch of salt in your cookie dough can actually help enhance the moisture in your cookies and bring out the sweetness, making them taste even chewier. Salt also balances the flavors, so your cookies don’t taste overly sweet or too rich. Just a 1/4 teaspoon of salt for a typical batch of cookies will do the trick. - Use the Right Flour:
The type of flour you use can affect the texture of your cookies. For soft and chewy cookies, it’s best to use all-purpose flour, which has the right protein content for a tender, chewy cookie. If you use cake flour, the cookies may turn out softer and fluffier, but the texture might not be as chewy. Conversely, bread flour will result in cookies that are a bit denser and chewier due to its higher protein content. Stick with all-purpose flour for that perfect balance of chewy and soft.
By following these tips, you’ll be able to create chocolate chip cookies that stay soft and chewy long after they’ve come out of the oven. From the right balance of sugars and fats to how you bake and store your cookies, every step plays a role in maintaining that irresistible texture. With these strategies, your chocolate chip cookies will always be soft, chewy, and utterly delicious—just like they came from your favorite bakery!
Measuring Ingredients Correctly
One of the most important aspects of baking is accurate ingredient measurement. Even small variations in the quantity of ingredients can dramatically affect the texture, taste, and consistency of your chocolate chip cookies. Whether you’re a beginner or an experienced baker, understanding how to measure ingredients correctly ensures that your cookies turn out as intended—soft, chewy, and perfectly balanced. Here’s how to measure each ingredient properly and why it matters:
- Flour Measurement: The Spoon-and-Level Method
Flour is the backbone of your cookie dough, but it’s also one of the most commonly mismeasured ingredients. Too much flour can lead to dry, dense cookies, while too little flour can result in cookies that spread too much and turn out flat. The most accurate way to measure flour is by using the spoon-and-level method:- Spoon the flour into your measuring cup using a spoon (not directly scooping from the flour container). This prevents compacting the flour, which can lead to adding too much.
- Level off the excess flour with a flat edge (like the back of a knife) to ensure you’re using the correct amount.
- Measuring Sugar: No Need for Sifting
Sugar, especially brown sugar, needs to be packed into your measuring cup for accurate measurement. Granulated sugar is typically measured by spooning it into the cup and leveling it off, but brown sugar should be packed tightly into the measuring cup until it holds its shape. This ensures that you’re using the correct amount of sugar, which is essential for the chewy texture you’re aiming for in your cookies.Tip: When measuring brown sugar, press it down firmly into the measuring cup to eliminate air pockets. If the sugar is too loose, your cookies could turn out too dry. - Measuring Wet Ingredients: Accurate and Even
For wet ingredients like butter, oils, eggs, and vanilla extract, it’s important to measure them using the correct method to maintain the correct dough consistency. For liquids like vanilla extract or milk, use a liquid measuring cup (typically with a spout) and fill it to the line at eye level. This ensures that you’re using the exact amount of liquid called for in your recipe.Tip: If you’re measuring butter, most sticks of butter have measurements marked along the wrapper, making it easy to use the right amount. If you’re using softened butter, make sure it’s not too melted, as that can affect the texture of your cookies.- For eggs, crack them into a separate bowl first to check for any shell fragments and then add to the dough. If your recipe calls for room temperature eggs, be sure to let them sit at room temperature for at least 30 minutes before baking. This ensures a smoother batter and better incorporation of the ingredients.
- Measuring Baking Powder and Baking Soda: Precision Matters
Baking powder and baking soda are the leavening agents responsible for making your cookies rise. Too much or too little of these ingredients can impact the texture and spread of your cookies. Use a measuring spoon to scoop out the exact amount required, and always level it off with a flat edge. It’s important not to “eyeball” these measurements—too much baking soda can lead to a bitter taste, while too little can cause cookies to be flat.Pro Tip: Baking soda and baking powder can lose their potency over time. To ensure they work effectively, check the expiration date and test them before using. You can test baking soda by adding a small amount to vinegar—if it bubbles, it’s still active. Test baking powder by adding it to warm water—if it fizzles, it’s good to go. - Correct Butter Temperature:
The temperature of your butter plays a significant role in how your cookies bake. Room temperature butter (about 65-70°F or 18-21°C) is ideal for creaming with sugar, resulting in a light, airy dough. If your butter is too cold, it won’t incorporate well with the sugar, leading to dense cookies. If it’s too soft or melted, your cookies will spread too much and become thin.Tip: If you forget to take the butter out in advance, you can soften it in the microwave for 5-10 seconds in short bursts or cut it into small pieces to help it soften faster. Avoid melting the butter entirely, unless the recipe specifically calls for it. - Measuring Salt and Spices: Don’t Overdo It
While salt is crucial for balancing the sweetness of chocolate chip cookies, it’s easy to add too much. Always use a measuring spoon to get the right amount of salt, especially if you’re working with a recipe that includes a variety of spices (like cinnamon or nutmeg). Just a pinch too much salt can overwhelm the flavors in the cookies.Tip: When using ground spices, make sure they are fresh and measured accurately to avoid overpowering the flavor profile. Fresh spices have a stronger, more vibrant flavor, so use them in moderation. - Weighing Ingredients for Consistency:
If you want to take your baking accuracy to the next level, consider using a digital kitchen scale for all your ingredients. This is particularly helpful for flour, as measuring by weight can reduce inconsistencies caused by compacting or overpacking. For example, if a recipe calls for 1 cup of flour, weighing it out ensures you’re using exactly the amount specified.Pro Tip: Weighing ingredients ensures that you’re following the recipe precisely, and it’s especially helpful for repeat baking—every time you make a batch, your measurements will be identical, which leads to consistent results.
Why Measuring Correctly Matters for Soft and Chewy Cookies:
Each ingredient in your chocolate chip cookie recipe plays a key role in determining the texture and consistency. For soft and chewy cookies, it’s crucial to get the ratios right—too much flour, for instance, can make the cookies dense, while too much butter or sugar could make them too greasy. Similarly, accurate measurements of baking powder or soda ensure the dough rises just the right amount. Small miscalculations can result in cookies that are too flat, too hard, or not spread properly.
Properly measuring your ingredients doesn’t just ensure a better texture, it also makes the process smoother and more efficient. You’ll get more consistent results each time you bake, giving you confidence in your cookies and making your baking process more enjoyable. With a little attention to detail, you can bake soft, chewy chocolate chip cookies that are perfectly balanced in flavor and texture every time.
Troubleshooting Common Issues
Even with the best recipes and techniques, there are times when chocolate chip cookies don’t turn out exactly as planned. From flat cookies to dry dough, there are a variety of reasons why your cookies may not come out perfect. Don’t worry though—baking is an art, and with a little troubleshooting, you can fix common problems and achieve that perfect batch every time. Here are some of the most common issues that arise while baking chocolate chip cookies and how to solve them:
1. Cookies Spread Too Much
One of the most frequent problems when baking chocolate chip cookies is when they spread too much during baking. Instead of ending up with thick, chewy cookies, you get thin, crispy discs. Here’s how to solve this problem:
- Too much butter or not enough flour: If there’s too much fat in the dough or not enough flour, the cookies will spread too thin. Make sure you measure your butter and flour carefully (using the spoon-and-level method for flour) to maintain the right balance.
- Chill the dough: One of the best ways to prevent your cookies from spreading too much is to chill the dough for at least 30 minutes before baking. This helps firm up the fat in the dough, preventing the cookies from spreading excessively while baking.
- Check oven temperature: Sometimes the issue is with your oven temperature. If it’s too low, the cookies might spread too quickly before they have time to set. Make sure your oven is preheated properly and, if necessary, use an oven thermometer to ensure the correct temperature.
- Use a silicone baking mat or parchment paper: A non-stick surface like a silicone mat or parchment paper can help cookies bake more evenly and prevent them from spreading too much.
2. Cookies Are Too Thin or Hard
If your cookies are coming out thin, crisp, or hard instead of soft and chewy, there are a few key factors to look into:
- Overmixing the dough: Overmixing the dough can cause the gluten in the flour to overdevelop, which leads to tougher cookies. To avoid this, mix the dough only until the ingredients are just combined.
- Baking at too high of a temperature: Baking at a higher temperature than recommended can cause the cookies to bake too quickly and become crisp. Stick to the recommended temperature in the recipe (usually around 350°F/175°C) to give the cookies time to bake evenly and develop a chewy texture.
- Underbaking: If you underbake the cookies too much, they may come out thin and crisp rather than soft and chewy. When baking, keep an eye on the cookies, and remove them from the oven as soon as the edges are golden and the centers look slightly puffed.
3. Dry or Crumbly Dough
If your cookie dough feels dry, crumbly, or hard to work with, it could be due to several factors:
- Too much flour: If you’ve added too much flour to your dough, it can become dry and difficult to form into balls. Be sure to measure your flour properly, and remember to spoon and level it rather than scooping it directly from the bag.
- Not enough fat or liquid: Fat (butter or oil) and liquid (eggs or milk) help bind the dough together and provide moisture. If your dough is too dry, try adding a tablespoon of milk or water to help bring it together. Also, ensure that your butter is soft and not too cold when you begin mixing.
- Too much sugar: Sometimes, an excess of sugar in the dough can cause the dough to feel crumbly. If this happens, reduce the amount of sugar slightly and adjust your dry ingredients accordingly.
4. Cookies Are Too Soft or Doughy in the Center
Sometimes cookies can bake unevenly, with the edges crisping up while the centers remain soft or doughy. This can be caused by a few different factors:
- Undercooking: If the cookies are removed from the oven too early, the centers will remain soft and doughy. Always check the edges—if they’re golden brown and the centers are still slightly puffed, the cookies are done. Leave the cookies on the baking sheet for a few minutes to set before transferring them to a cooling rack.
- Chilling the dough: If the dough is too warm when you place it on the baking sheet, the cookies will spread too much in the oven, causing the centers to bake unevenly. Chilling the dough for 30 minutes (or even up to 24 hours) will help prevent this issue and promote even baking.
- Too much liquid: Adding too much liquid (milk, eggs, etc.) to your dough can result in cookies that don’t hold their shape during baking. Ensure that you measure your wet ingredients carefully and avoid overmixing the dough.
5. Cookies Burn on the Bottom
If the bottom of your cookies is getting too dark or burned, it’s usually because of one or more of the following:
- Overbaking: Make sure you’re not leaving your cookies in the oven too long. Start checking them around the 8-minute mark if you’re baking at 350°F (175°C). When the edges are golden and the centers are slightly puffed, they’re ready to come out.
- Using the wrong baking sheet: Dark-colored baking sheets absorb more heat and can cause the bottoms of your cookies to brown too quickly. Consider using light-colored or shiny baking sheets, which distribute heat more evenly and reduce the chance of burning.
- Position in the oven: If your cookies are baking too close to the bottom of the oven, they may burn. Position your baking sheet in the middle rack of the oven to promote even heat circulation and prevent the bottoms from burning.
6. Cookies Are Too Sweet
If your cookies taste overly sweet, it could be because of an imbalance between sugar and other ingredients. Here’s how to fix it:
- Reduce sugar: If you find the cookies too sweet, you can reduce the amount of granulated sugar or brown sugar slightly to adjust the sweetness. Be mindful that too little sugar can affect the texture and spread of the cookies, so reduce it in small increments.
- Add a pinch of salt: A small amount of salt can help balance out the sweetness in chocolate chip cookies. Don’t skip the salt—it enhances the flavor and prevents the sweetness from becoming overpowering.
- Use bittersweet or semisweet chocolate chips: The type of chocolate you use can also affect the sweetness. If your cookies are too sweet, try using semisweet or bittersweet chocolate chips rather than milk chocolate chips. The darker chocolate provides a rich, slightly bitter flavor that balances the sweetness of the dough.
7. Uneven Chocolate Chip Distribution
Sometimes, the chocolate chips in your cookies might not be evenly distributed, leading to pockets of chocolate and bland areas. Here’s how to ensure even distribution:
- Fold the chips in gently: After adding the chocolate chips to the dough, fold them in gently by hand or with a spatula. Overmixing can break the chips into smaller pieces and prevent even distribution.
- Toss the chips in a little flour: To help the chocolate chips stay suspended in the dough, you can toss them in a bit of flour before adding them to the dough. This will help keep the chips from sinking to the bottom during baking.
By addressing these common issues and troubleshooting along the way, you can fine-tune your baking technique and ensure your chocolate chip cookies turn out perfectly every time. With a bit of practice and attention to detail, you’ll be able to tackle any cookie baking challenge and produce a batch of soft, chewy, and delicious cookies every time.
Storing Leftovers
One of the best parts of baking chocolate chip cookies is enjoying them long after they’ve come out of the oven. However, to keep them fresh, soft, and delicious, it’s important to store them properly. Improper storage can cause your cookies to become stale, dry, or lose their chewy texture. Fortunately, with a few simple steps, you can keep your cookies fresh for days (or even longer) and make sure they maintain their perfect flavor and texture. Here’s how to store your chocolate chip cookies the right way:
1. Let Cookies Cool Completely Before Storing
Before storing your cookies, it’s essential to let them cool completely on a wire rack. If you store warm cookies, the heat can cause moisture to build up inside the container, making the cookies soggy or sticky. Allow the cookies to sit on the rack for about 15-20 minutes after baking. Once they’re completely cool, they’re ready to be stored properly.
Tip: If you’re in a rush, place the cookies on a parchment-lined tray and let them cool at room temperature before transferring them to storage.
2. Store in an Airtight Container
The best way to preserve the freshness of your chocolate chip cookies is by storing them in an airtight container. This prevents air from drying out the cookies, while also keeping them from absorbing unwanted odors from the fridge or surrounding foods. Depending on how many cookies you have, you can use various storage containers, from small plastic or glass containers to large cookie jars.
- For short-term storage (1-2 days): If you plan to eat the cookies within a day or two, simply place them in a sealed container at room temperature. They will remain soft and fresh as long as they’re kept sealed.
- For long-term storage (3-5 days): If you want your cookies to last longer, store them in an airtight container in a cool, dry place. This will help maintain their chewiness for up to a week.
Tip: Consider placing a slice of bread in the container with the cookies. The bread will absorb excess moisture, helping to keep the cookies soft and fresh.
3. Separate Layers with Parchment Paper
If you’re storing a large batch of cookies or stacking them in a container, it’s a good idea to place parchment paper between the layers. This prevents the cookies from sticking together and getting squished. Simply place a piece of parchment or wax paper between each layer of cookies to keep them separated. This helps maintain the cookies’ shape and texture, and also makes it easier to grab one at a time.
Tip: When using parchment paper, ensure the cookies are cool before stacking them to prevent any sticky spots or uneven textures.
4. Freezing Leftovers for Long-Term Storage
If you’ve baked a big batch of cookies and you know you won’t be able to eat them all within a few days, freezing is an excellent option for preserving their freshness for weeks. Here’s how to freeze your chocolate chip cookies while maintaining their deliciousness:
- Freeze unbaked cookie dough: For even more convenience, you can freeze the cookie dough itself. This allows you to bake just a few cookies at a time whenever you want them fresh from the oven.
- Scoop the dough onto a baking sheet, and freeze the dough balls for about 1 hour until firm.
- Once the dough balls are frozen, transfer them to an airtight container or freezer bag, and store them in the freezer. They’ll keep for up to 3 months.
- When you’re ready to bake, no need to thaw—just add an extra 2-3 minutes to the baking time.
- Freeze baked cookies: If you prefer to freeze the baked cookies, let them cool completely, then arrange them in a single layer on a baking sheet and freeze them until firm. Once frozen, transfer them to an airtight container or freezer bag. You can store the cookies for up to 3 months this way.
Tip: Label the containers with the date so you can easily keep track of when they were frozen.
5. Reheating Frozen Cookies
When you’re ready to enjoy a frozen cookie, it’s easy to bring it back to life! Here’s how to reheat your frozen chocolate chip cookies:
- Reheat in the oven: Preheat your oven to 300°F (150°C), place the frozen cookies on a baking sheet, and warm them for 5-8 minutes. The heat will help them regain their chewy texture and fresh-baked flavor.
- Reheat in the microwave: If you’re in a rush, place a frozen cookie on a microwave-safe plate and heat it for 10-15 seconds on high. For extra softness, place a damp paper towel over the cookie while microwaving to create a bit of steam, which helps soften it.
Tip: For the best results, reheat just one or two cookies at a time. This will ensure they stay fresh and soft.
6. Avoid Refrigeration (Unless You Need Extra Firmness)
While refrigerating cookies may seem like a good idea to keep them fresh, it’s generally not recommended for chocolate chip cookies. The cold air can cause the cookies to lose their chewy texture and become hard. However, if you prefer a firmer cookie or want them to keep their shape for a specific purpose (like decorating), storing them in the fridge for a few hours is fine. Just be sure to let them come to room temperature before serving.
Tip: If you accidentally store your cookies in the fridge and they become too hard, let them sit at room temperature for a few minutes to soften.
7. Using Cookie Jars for Display and Easy Access
If you prefer a more decorative option for storing your cookies, cookie jars are a great choice. They’re perfect for keeping cookies fresh for a couple of days and are a charming way to display your treats in the kitchen. Just make sure the jar is airtight to prevent air from drying out the cookies.
Tip: Make sure the cookie jar is kept in a cool, dry place—avoid placing it near the stove or direct sunlight, as warmth can cause the cookies to become stale more quickly.
Why Proper Storage Matters
Properly storing your chocolate chip cookies helps maintain their flavor, texture, and freshness for as long as possible. Whether you’re saving some for later or planning to share your cookies with others, the right storage methods ensure you get to enjoy your cookies just as much on day 2 or 3 as you did on day 1. By following these storage tips, you’ll ensure your cookies stay soft, chewy, and delicious for days—making every bite as enjoyable as the first!
FAQs About Making Easy Chocolate Chip Cookies
Why Are My Cookies Flat?
If your cookies are turning out flat instead of thick and chewy, there could be a few reasons for this:
- Too much butter or not enough flour: If the dough is too soft or there’s an imbalance of ingredients, your cookies may spread too much during baking. Try measuring your ingredients accurately and reduce the amount of butter slightly, or add a little more flour to thicken the dough.
- Warm dough: If the dough is too warm when you place it on the baking sheet, it can cause the cookies to spread too thin. Be sure to chill your dough for 30 minutes to 1 hour before baking.
- Baking at too low of a temperature: If your oven is not hot enough, the cookies will spread too much before they have a chance to set. Use an oven thermometer to ensure your oven is preheated to the correct temperature (usually 350°F/175°C).
Tip: Always allow the dough to cool before baking for best results.
2. Can I Use Different Types of Chocolate Chips?
Yes! The type of chocolate chips you use can greatly affect the flavor and texture of your cookies. You can experiment with various types of chocolate, such as:
- Semisweet chocolate chips: These are the classic choice and strike a balance between sweetness and bitterness, creating a well-rounded flavor.
- Milk chocolate chips: If you prefer sweeter cookies, milk chocolate chips are a great option, though they tend to be a bit sweeter than semisweet.
- Dark chocolate chips: For a richer, more intense chocolate flavor, dark chocolate chips (or bittersweet) are perfect. They pair especially well with the sweetness of the dough.
- White chocolate chips or butterscotch chips: If you’re looking to get creative, you can try using other types of chips like white chocolate, peanut butter, or even toffee pieces for added flavor.
Tip: Mixing different types of chocolate chips (e.g., a blend of semisweet and milk chocolate) can give your cookies an interesting flavor profile.
3. How Do I Make My Cookies Soft and Chewy?
If you love a soft and chewy chocolate chip cookie, here are a few tips to ensure you get the perfect texture:
- Use more brown sugar than white sugar: Brown sugar contains molasses, which contributes to the chewiness and moisture in the cookies. Try using a higher ratio of brown sugar to granulated sugar.
- Don’t overbake: Remove the cookies from the oven when the edges are golden brown, but the centers still look slightly soft. They will continue to firm up as they cool.
- Chill the dough: Chilling the dough before baking helps the cookies hold their shape and results in a chewier texture. It also enhances the flavors of the dough.
- Use the right amount of flour: Too much flour can make the cookies dry and crumbly. Be sure to measure your flour correctly by spooning it into the measuring cup and leveling it off.
Tip: If you find that your cookies are too crispy, you can add a tablespoon of cornstarch to the dough to make them more tender.
4. Can I Use Margarine Instead of Butter?
While butter is the go-to fat for chocolate chip cookies, you can use margarine as a substitute, but it may affect the texture and flavor slightly. Cookies made with margarine tend to be a bit softer and may not have the same rich, buttery flavor as those made with butter.
- For a firmer texture: If you’re using margarine, opt for the stick variety rather than the tub margarine, as it has a more solid texture that is closer to butter.
- For flavor: If you’re concerned about losing the rich flavor of butter, consider adding a small amount of vanilla extract or salt to enhance the flavor.
Tip: If you prefer a dairy-free version, you can also try using vegan butter as a butter alternative.
5. How Can I Fix Dry or Crumbly Cookie Dough?
If your cookie dough feels dry, crumbly, or difficult to work with, there are a few fixes to try:
- Add a little liquid: If the dough is too dry, add a tablespoon of milk, water, or even an extra egg to bring it together. Start with a small amount and add more if needed.
- Adjust the flour: If you suspect you’ve added too much flour, gently knead the dough to bring it together and add a little more butter to help the dough hold together.
- Warm the dough: If the dough has become too stiff or cold, you can warm it up slightly by letting it sit at room temperature for a few minutes. If the dough is still too stiff to handle, try microwaving it for 5-10 seconds to soften it.
Tip: If the dough becomes too sticky, try chilling it before shaping it into balls, as this will make it easier to handle.
6. Can I Make Chocolate Chip Cookies Ahead of Time?
Yes! If you want to prepare your chocolate chip cookies in advance, there are several ways to do it:
- Prepare the dough ahead of time: You can mix up the dough a day or two before baking. Store the dough in an airtight container in the fridge or freezer. When you’re ready to bake, simply scoop out the dough and bake as usual.
- Freeze the cookie dough: If you want to make your cookies even further in advance, scoop the dough into balls and freeze them. Once frozen, transfer the dough balls to a freezer-safe container or bag. When you’re ready to bake, place the frozen dough balls on a baking sheet and bake at the usual temperature (you may need to add a few extra minutes to the bake time).
- Baked cookies: If you have leftover baked cookies, you can store them at room temperature for a few days or freeze them for long-term storage.
Tip: Freezing cookie dough allows you to bake a fresh batch of cookies whenever you want without starting from scratch.
7. How Do I Know When My Cookies Are Done?
The best way to know when your cookies are done baking is by closely observing the edges and centers:
- Golden edges: The edges of the cookies should be golden brown while the centers look a bit puffed. This is a sign that the cookies are done.
- Slightly soft centers: The centers should still look slightly soft but set. They will continue to firm up after you remove the cookies from the oven.
- Timing: In general, most chocolate chip cookies bake for about 8-10 minutes at 350°F (175°C), but this can vary based on your oven and the size of your cookies. Start checking around the 8-minute mark and adjust the time as needed.
Tip: If you’re unsure, it’s always better to underbake slightly—cookies continue to cook as they cool, and this will help them stay soft.
8. How Can I Make My Cookies More Flavorful?
To enhance the flavor of your chocolate chip cookies, you can try the following tips:
- Add a pinch of salt: A little extra salt can balance out the sweetness and enhance the chocolate flavor.
- Use high-quality chocolate: Choose premium chocolate chips or even chopped chocolate bars for a richer flavor.
- Add spices: If you’re feeling adventurous, try adding a dash of cinnamon, nutmeg, or vanilla bean paste to the dough for a unique twist on the classic cookie.
- Experiment with extracts: While vanilla extract is traditional, you can try almond extract or even coffee extract to deepen the flavor.
Tip: Taste the dough before baking (just make sure it’s egg-free if you’re concerned about raw eggs!) and adjust the sweetness, salt, or spice to your liking.
By answering these common questions and offering helpful solutions, you’ll be well on your way to baking a perfect batch of chocolate chip cookies every time. Whether you’re troubleshooting a problem or trying to elevate your cookie-making skills, these tips will help you become a chocolate chip cookie expert in no time!
Conclusion
Chocolate chip cookies are more than just a classic dessert—they’re a timeless treat that brings comfort, nostalgia, and joy with every bite. Whether you’re baking them for a family gathering, a quick snack, or as a sweet pick-me-up on a busy day, their soft, chewy texture and rich chocolate flavor are guaranteed to brighten anyone’s day. With a recipe as simple and quick as this one, you can whip up a batch of cookies that rivals even the most gourmet bakeries in less than 20 minutes.
Reflecting on Their Versatility
One of the best things about chocolate chip cookies is their incredible versatility. From experimenting with different types of chocolate chips to adding in your favorite mix-ins, such as nuts, dried fruits, or candy pieces, these cookies can easily be tailored to suit your taste buds. Whether you like them soft and chewy, crispy and thin, or thick and gooey, this recipe provides the perfect base to make them your own.
The Joy of Baking Made Easy
This recipe isn’t just about the cookies—it’s about the joy of baking itself. The process is straightforward and approachable, making it ideal for bakers of all experience levels. Whether you’re a seasoned pro or a beginner testing the waters, the step-by-step instructions, helpful tips, and customizable options ensure success every time. Baking these cookies is also a wonderful way to spend quality time with loved ones, from measuring and mixing ingredients together to sharing the first warm, fresh-out-of-the-oven bite.
A Treat for All Occasions
Chocolate chip cookies are perfect for nearly any occasion, from casual afternoon snacks to special celebrations. Their universal appeal makes them a crowd favorite at potlucks, school events, or even as a thoughtful homemade gift. With this easy recipe, you’ll always have a go-to dessert that’s quick to prepare and guaranteed to impress.
Encouraging Readers to Get Baking
Now that you’ve learned the secrets to creating delicious chocolate chip cookies, it’s time to grab your mixing bowl and preheat that oven. The ingredients are simple, the process is quick, and the results are incredibly rewarding. Don’t be afraid to get creative with your add-ins, experiment with flavors, or even double the batch to share with friends and family.
Remember, the beauty of baking is in the experience itself—embrace the little imperfections, savor the delightful aroma that fills your kitchen, and most importantly, enjoy the smiles these cookies bring to those around you. Whether you’re baking for yourself or others, chocolate chip cookies are a true symbol of warmth and love.
Closing Encouragement
So, what are you waiting for? With just a few pantry staples and a little bit of time, you can create cookies that are not only delicious but also a testament to how easy baking can be. Start small, dream big, and let your baking adventure begin with this simple, foolproof recipe. Your perfect chocolate chip cookies are just one bake away—happy baking!
Quick and Wholesome Breakfast Treats
If you’re a fan of quick and delicious baked goods like these chocolate chip cookies, why not explore another easy-to-make treat? Check out our recipe for Wholesome Cinnamon Breakfast Muffins in 20 Minutes. These muffins are perfect for busy mornings, offering a warm, spiced flavor that pairs beautifully with a cup of coffee or tea. Ready in just 20 minutes, they’re a fantastic option for a wholesome breakfast or a mid-morning snack. Click the link to discover how to whip up these delightful muffins today!